Thursday, December 27, 2012

My Most Popular Cakes of 2012

Since making the decision to focus only on fondant toppers and cookies, I've had to say no to a few cake orders the last few months. Although I know it's the right decision, I'm going to miss making cakes for my customer's special celebrations!

Here's a few of the cakes I made in 2012. While I made many cakes this year, these were the most popular ones shared online...via Facebook, party blogs such as Kara's Party Ideas, Hostess with the Mostess and Lil'Sugar and that were shared on Pinterest.

The Florida Gator cake made for Nikki Glynn of  Great Gatherings

A Bon Voyage cake for a special send off

For a sweet Cookie Monster loving little boy

 This cake was a hit among polka dot and cupcake lovers alike
 I loved this Matroyshka themed party! (photo by Wendy Updegraff Photography)

This Ocean Reef Animal cake was super fun to make for Nikki of Great Gatherings!
                                                (photography by Lauren Mckinsey Designs)

The Hunger Games cake on FIRE! 

My daughter's camping cake was named as one of Lil'Sugar's top unique birthday cakes!
 
 This bright & fun Chevron cake is hands-down THE most popular cake I've ever made!! 
Shared and pinned more times than anything else I've created!

2012 was certainly a fun year of cakes! I'm looking forward to whatever sweet things 2013 brings my way!


Wednesday, December 5, 2012

Easy ways to dress up your Holiday Cakes!

For the Winter Issue of Bird's Party Magazine, I shared some simple ways to dress up your holiday cakes!


No matter the size or theme of your gathering, nothing dresses up a holiday table like a gorgeous cake! The holidays are the perfect time to add some glitzy sparkly drama to your dessert with a few products that you can find at your local craft and party supply store.

Use a homemade or a plain cake from your favorite bakery and add these decorating supplies:
-Wilton Color Mist Spray in silver, gold and pearl
-Wilton White Sparkling Sugar
-Sixlets candy in white and black
-Lindt White Chocolate Truffles
-number candles
-optional: pinecone floral pick
If you are planning a winter themed party, this snowy cake is sure to add some sparkle to your festivities! Start with a cake frosted white and stack white chocolate truffles on top (to resemble a pile of snowballs). You can use a bit of frosting to adhere them together if needed. Next, cover the entire cake, including the truffles, with the Wilton Pearl spray. Finally, sprinkle white sparkling sugar over the entire cake for some extra sparkle.


If you want to add some GLAM to your dessert table, use the Wilton Gold spray. Frost your cake simply in a rustic style and then completely cover with the spray. Top your cake with a festive pinecone floral pick or use some seasonal fruit if you prefer. If using a glittery floral pick as shown, be sure to completely seal it with a clear food safe sealer to keep glitter from getting on your cake.


To ring in the New Year in sweet style, serve this fun and festive cake! Use the Wilton silver spray to completely cover your cake and then use black and white candy Sixlets to create a fun border. For the 2013 topper, use birthday candles and trim off the wicks. If you can’t find the candles in colors you like, use additional edible spray to color them to your liking.


 For more holiday entertaining ideas, be sure to check out the Winter Issue of Bird's Party Magazine

Sunday, September 9, 2012

Cupcake themed birthday cake

Cupcakes make a fun party theme, especially when paired with colorful polka dots! I was asked to make a cake for a little girl's birthday who was celebrating with the cupcake polka dot theme.

The little girl's mom wanted the cake to match the cute partyware she was using. Lots of bright colors & fun cupcakes made for a super cute cake! The cake was topped with a 3D cupcake.

Inside the cake was a tier of yummy chocolate chip cake with chocolate buttercream filling and a delicious vanilla cake with strawberry cream cheese filling.


A very sweet birthday indeed!

Saturday, September 8, 2012

Icing Smiles Cake {pretty in pink}

This weekend I had the privilege to make a cake for an Icing Smiles recipient. Icing Smiles is an amazing non-profit organization that partners with cake decorators around the country to provide free custom cakes to critically or terminally ill children. It is truly an honor to be an Icing Smiles "sugar angel" and to play a small part in putting a smile on a sweet child's face.

I was called to make a birthday cake for sweet Callie Ann. She turned 5 and her mother told me she is a girly girl who's favorite colors are pink & blue.

I topped the cake with a shimmery 5, dress up shoes and jewlery and a big shimmery bow on the front. Callie Ann also loves polka dots, so mom requested pink & blue polka dots.

Inside were two tiers of vanilla cake, one filled with cookies n cream filling & the other with toasted marshmallow creme.

You can find out more about this wonderful organization and how YOU can help...check them out:


Friday, August 31, 2012

{DIY} Embellished Invitations

Printable invitations are a great budget saver for any party! I'm over at Piggy Bank Parties sharing some simple ways to embellish your printable invites for a custom look to WOW your guests.

Head over to Piggy Bank Parties for my tips!

Sunday, August 12, 2012

Cookie Monster Cake

Cookie Monster is my FAVORITE character from Sesame Street! How could that sweets lover NOT be my favorite right?? So when I was asked to make a Sesame Street cake for a little boy who loves Cookie Monster I was thrilled!

The design inspiration was taken from the adorable and modern invite from WH Hostess. I incorporated the fun & bright chevron pattern, added polka dots and of course...Cookie Monster!

In addition to the cake, I also made cupcakes and topped them with cookie monster toppers as well.

C is for Cookie and for a CUTE birthday theme too!

Thursday, August 9, 2012

70's Vintage Barbie Camping Party

My baby girl turned 6 a couple weeks ago...SIX!!! I still can't believe my baby is not really a baby anymore. Like many girls her age, she's really into Barbie. For Christmas she received a Barbie camping set and immediately asked for a Barbie Camping party. Yes, she picks her party themes 6 months ahead (good girl)! She's not a super PINK girly girl so I decided to put a fun spin on the theme and went with a 70's Vintage vibe. It all started with this great find...a 1971 Barbie Country Camper!

Of course I knew the awesome design team of Piggy Bank Parties would love this theme and knock it out of the park...and they did. They began with the invitation...which included a Barbie-esque illustration of my daughter. They also created the entire printable collection and the favor boxes!

I want to point out that this post is a mix of pictures from Wendy Updegraff and ones I took myself. I'm sure you can tell them apart LOL, but thought I would mention it ;)

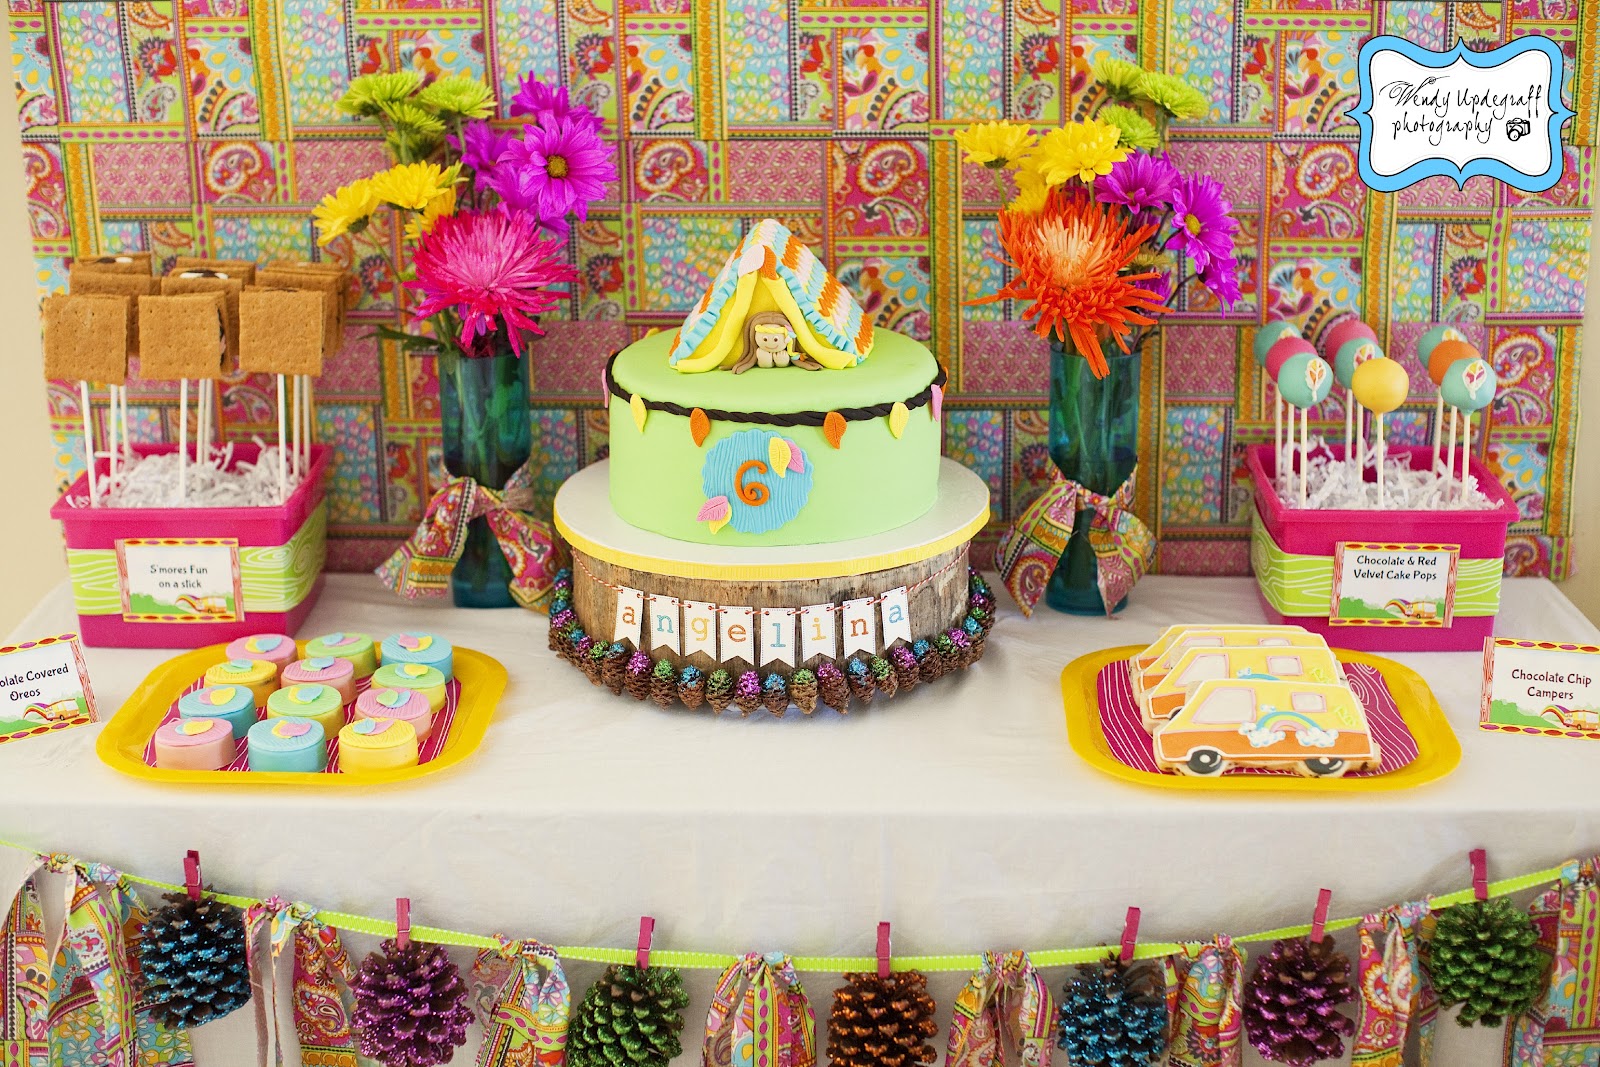
I really wanted to give the party a girly but 70s feel, so I incorporated fun fabric patterns like paisley, bright colors (lots of yellow, aqua & orange) and FEATHERS! I also wanted to tie in the camping theme by using wood grain patterns and some natural elements like pine cones, tree stump and twigs. But keeping it "Barbie Style" I glittered and spray painted the heck out of it all!


Our dessert table included awesome cookies from Bambella Cookie Boutique made to look like the camper and delicious cake pops from Cuter than Cake decorated with feathers. I made s'mores on a stick, decorated Oreos with wood grain and fondant feathers and of course...the cake, which you can read more details about on my cake post!


I used a tree stump for my cake stand, added glitter pine cones and my beautiful cake bunting from the Purple Pug!

I found this kinda ugly frame at Goodwill, but loved the design. After some spray paint, printable wood grain paper,glitter letters, and feathers of course, it was perfect for my dessert table backdrop!

I saw this pine cone garland and it gave me the idea to make my garland. But I incorporated a fabric strip garland that I've seen & loved at so many parties out there! To give it that Barbie "Sparkle" I added glitter. These pine cones where one of my favorite things and totally worth all the glitter that was stuck to my fingers for a few days!
I edited the copy of a 70's Barbie & Skipper Go Camping book that I bought off of Ebay. I printed it and displayed it inside a frame that I decorated with the chevron tape and wood grain printable paper.

My daughter's favorite food is hot dogs and along with chips, it was the perfect camping food! Instead of paper plates, I used tins...an idea I borrowed from Dot & Dash's camping party. I used recycled cans, embellished with more of my printable wood grain paper and fabric strips, to hold our utensils and straws. For drinks we served juice for the kids and one of my favorite '70s sodas for the adults...Orange Nehi!

The food and beverages where displayed on my built-in shelf. I decorated the shelf with camping items...lanterns, cooler, camp coffee maker and a camping pot. I made bunting from chevron Duck tape to decorate a few of the items.


How awesome is the vintage camper "Happy Camping" banner from Stampin' Fanatic? I love that ribbon and those campers are ADORABLE!
I made a lot of the party favors. The first thing I made were the feather hair clips (tutorial coming soon), embellished backpacks, embellished canteens, and clip boards that I covered with more of the Duck Tape. I dressed up some inexpensive frames with twigs and feathers to hold our party signs.


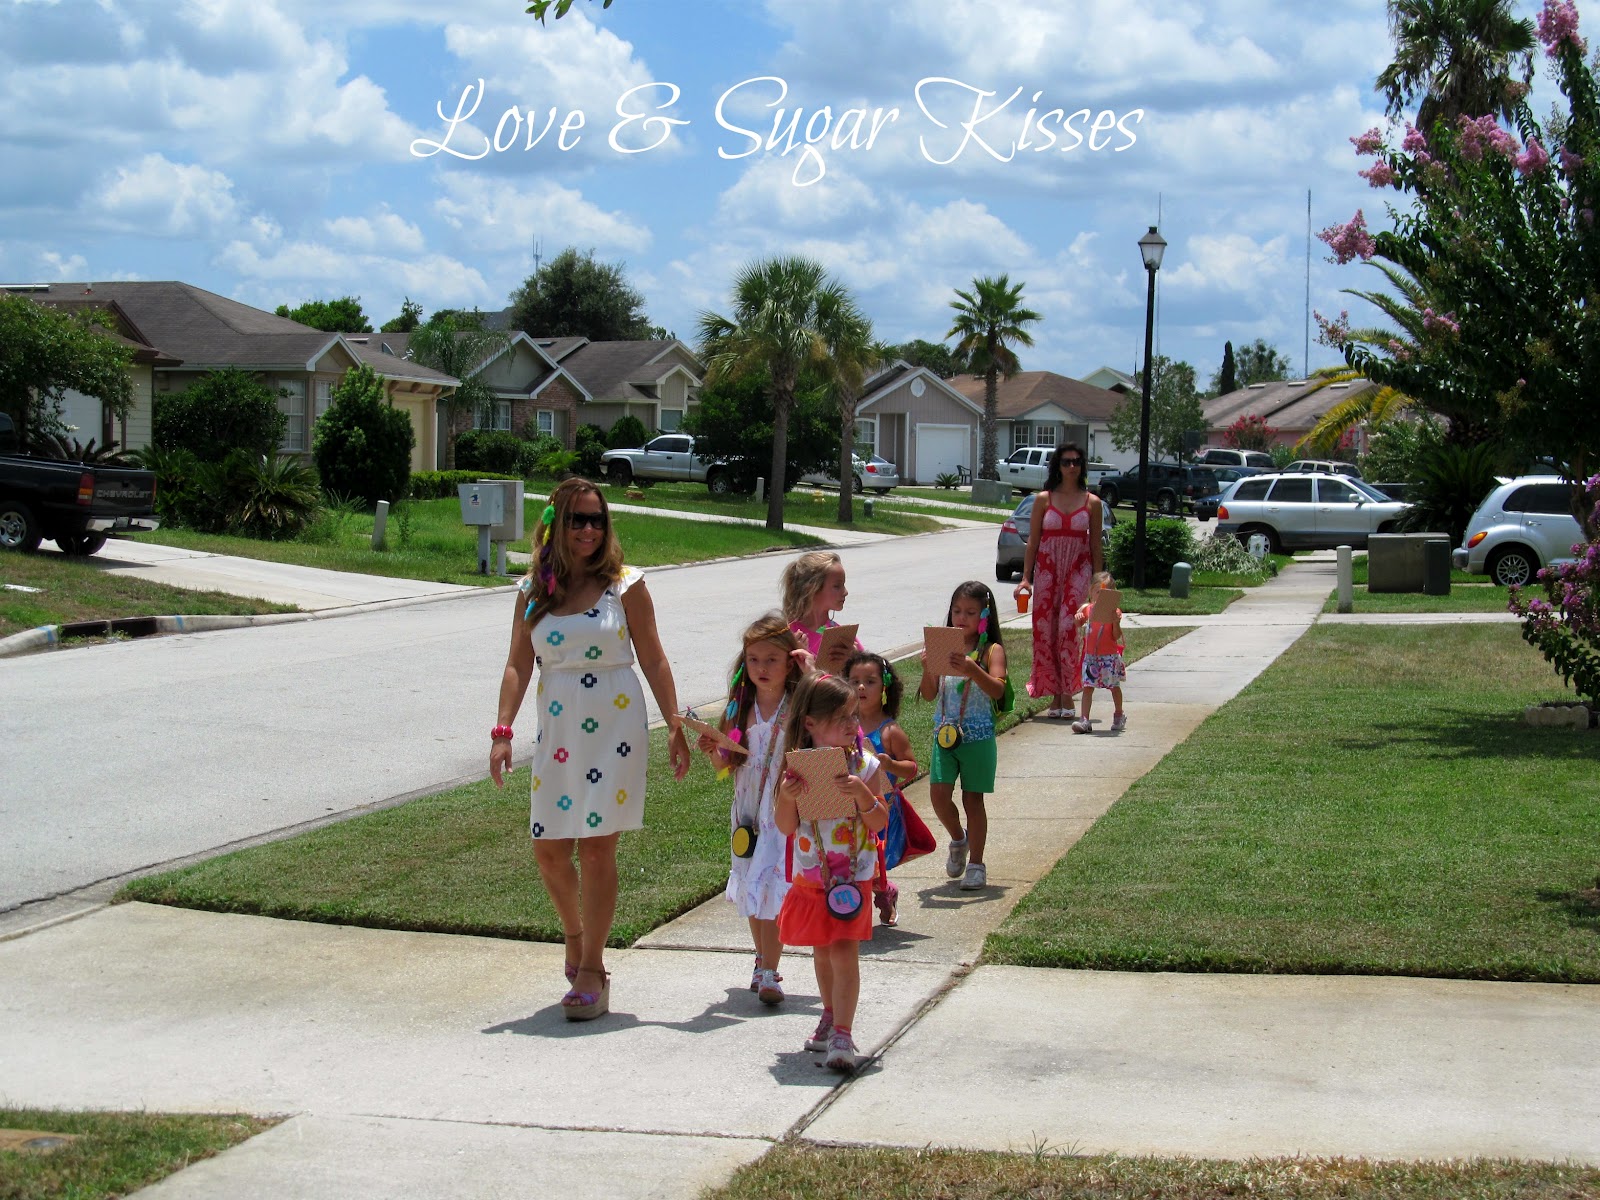
Our first party activity was to go on an Adventure Walk and look for certain items. Our guests ranged in age from 3 to 6 so I felt a scavenger hunt was going to be a bit much in the 98 degree summer heat! Plus I have a really tiny yard with little room for scavenging! I used a free printable from Smashed Peas and Carrots for our list of items to look for and changed it up a little to fit our party.

Here I am prepping the girls for their Adventure walk!

The cutest little ladies in the neighborhood!


After our walk, we cooled off and ate lunch around the camp fire. I cut out pieces of fabric so each girl would have her spot!
After lunch we sang a few songs around the fire. Then it was time for my favorite activity...the S'mores Relay Race!! I got this idea in my head to create large "s'mores" that the girls would have to assemble. I used pillows for the marshmallows, foam boards wrapped in kraft paper for the graham crackers and spray painted more foam boards dark brown for the chocolate bars. They were divided into teams of 2 and had to assemble 2 s'mores. It was quite hilarious to watch them scramble...especially the littlest ones!


Back inside to cool off and enjoy some sweets! I sent our guests home with bags of trail mix, bubbles and favor boxes. Piggy Bank parties is known for their AMAZING favor boxes and these were no exception...detailed replicas of the Barbie Camper!!


Inside the favor boxes were Barbie stickers, some flavored Chapstick and bottle cap necklaces that my daughters made.

My beautiful daughter had a blast at her party! Seeing her smile lights up my world and was the best part of our celebration!
 My beautiful babies! Can you tell my youngest absolutely ADORES her big sister?

Happy Birthday my angel!

Vendors:
Photography: Wendy Updegraff Photography
Custom illustration, invitation, printables & favor boxes: Piggy Bank Parties
Camper cookies: Bambella Cookie Boutique
Cake pops: Cuter than Cake
Mini cake bunting: The Purple Pug
Happy Camping banner: Stampin' Fanatic
Straws: The Sugar Diva
Nehi Soda: Hometown Favorites
Fabrics: Hobby Lobby

**Vote for this party at My Insanity's 5th Annual Party Party! Click on the button below to head over!