Thursday, March 1, 2012

Salted Caramel Swiss Meringue Buttercream {Recipe}

I was so excited to share this delicious recipe with you today...and then I realized I'd already shared it...back on this cake post LOL!!! But since I spent all morning taking and editing pictures for today's post, I'm going to share it again anyway! This is more of a step by step recipe than the original, so hopefully you'll still enjoy this somewhat of a {repeat} performance.

This amazing Salted Caramel Swiss Meringue Buttercream is definitely one of my most requested cake filling flavors and a personal favorite as well. If you've never made Swiss Meringue, it may seem a little complicated, but I promise it is easier than it appears and totally worth the effort!! The complete recipe is at the end of this post and is adapted from the fabulously talented Sweetapolita's recipe!


The first step is to make the caramel by boiling the sugar and water together. I set my stove to just above medium, but each stove is different so you may need to adjust your settings. Stir the mixture occasionally until it begins to gently boil.

Once it begins to boil, stop stirring and instead gently swirl the pan from time to time. You want to boil your sugar until it turns amber colored. For me it takes about 14 minutes. It is super important not to walk away because once the sugar starts to caramelize, it's fast and can burn quickly. A burnt caramel cannot be saved...so keep an eye on your pot! When it's amber colored...pull it off the stove.

Next, whisk your heavy cream in. It will sputter and spit at you so be careful because that sugar is hot! Add your salt and whisk until smooth.

Now put aside that beautiful caramel to cool while you make your buttercream. The first step to making Swiss Meringue is too heat your egg whites with the remaining sugar. You don't have to own a double boiler to do this. As as you can see, I just fill a pot with an inch or so of water and get the water simmering (not boiling). Then I put my mixing bowl right on top.

A candy thermometer is a must...mine is a little too short, but it does the job. Your goal here is to heat the eggs until they reach 160 F...NOT to scramble them. Whisk them every now and then while they heat up.
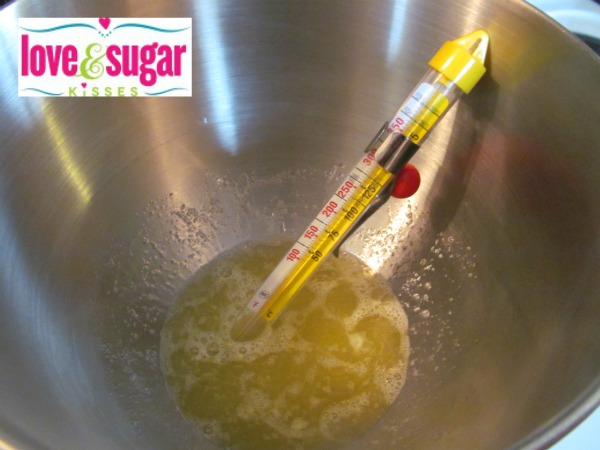
Once they reach 160, take your mixing bowl off the pot (wipe it dry) and attach it to your mixer with the whisk attachment on. You are going to whip the egg whites on a medium speed for about 5 minutes. Then increase your speed to medium high for 5 more minutes until you have stiff glossy peaks. Maybe I'm just a kitchen dork, but I think it is so COOL to watch egg whites go from watery goo...

To fluffy, delicious meringue!!

Once the bottom of your mixer bowl is no longer warm to the touch, you can begin adding your butter...a little at a time.

Don't be alarmed if the mixture begins to look a bit curdled like this...it's perfectly normal. It will come back together smoothly!

Add your vanilla and continue whipping until your frosting is fluffy and smooth. Now it's time to add in the caramel. Switch your mixture to the paddle attachment and pour in the caramel.

Beat mixture on low to medium for about 3-5 minutes until the caramel is fully incorporated. You have just made one of the most DELICIOUS silky smooth frostings there is!

This frosting goes on so smoothly and will melt in your mouth! I find the salt in the recipe to be just the right amount and gives just a hint of salty. But if you prefer a tad more salt, you can sprinkle a little on top of the frosting between your cake layers.

Chocolate cake and salted caramel buttercream is my favorite combination!

Here is the recipe in it's entirety! Enjoy!!

Salted Caramel Swiss Meringue Buttercream
adapted from Sweetapolita

Yield: 4 cups
Ingredients:
1 cup sugar
1/4 cup water
1/4 cup heavy cream
1/4 tsp sea salt (additional for sprinkling is optional)
1 1/2 cups unsalted butter (3 sticks cut into pats)
4 large egg whites
1 tsp pure vanilla extracct

Directions:
First, make the caramel as follows:
Place 1/2 cup + 2 Tablespoons of the sugar and the water in a medium saucepan over medium heat.
Brush down the sides of the pan w/ a damp pastry brush to prevent sugar crystals from forming (or a damp paper towel will work as well).
Stir the sugar and water together. Stir occasionally until water begins to boil.
Continue boiling sugar, gently swirling in the pan from time to time, until it reaches a dark amber color.
Remove from heat and slowly add cream, whisking until smooth.
Whisk in sea salt and set aside to cool.

Next, make the buttercream:
Wipe the bowl of your mixer clean with lemon juice. This helps remove any residual grease or fat that may be on your bowl, which if present will keep your egg whites from whipping up! 
Place egg whites and remaining sugar in the bowl and whisk together.
Place bowl over a pot of simmering (not boiling) water.
Using a candy thermometer, heat eggs and sugar until the temperature reaches 160 degrees Fahrenheit (whisking occasionally).
Remove bowl from heat and place onto mixer with the whisk attachment on. Whisk eggs on medium speed for 5 minutes.
Increase speed to medium high and whisk for 5 more minutes or until stiff glossy peaks form.
Once the bottom of the bowl is no longer warm to the touch, add butter a little at a time.
Add vanilla and continue to whip for a few minutes or until frosting is smooth.

Finally, switch to the paddle attachment and add in the caramel. Mix until fully combined, scraping the sides and bottom of bowl. Frosting can be stored tightly covered for several days at room temperature. If you refrigerate, be sure to let it come to room temperature and re-whip before using.

I know you'll enjoy eating this delicious frosting and I hope you enjoy making it as well!

Tuesday, February 21, 2012

Puppy Cake

I LOVE puppies for a birthday party theme! Ok...I might be a little biased since my daughter had a Puppy Party last year. But I think it is so cute and works well for a boy or a girl, so I was super thrilled when I was contacted to make a puppy themed cake for a little girl's birthday. I was even more thrilled when the mom wanted me to make the same topper I made for my daughter's puppy cake!

On delivery day, my camera had major issues and I was unable to take any pictures (what a heartbreaker!). BUT...luckily the mom took some pictures of the cake that she shared with me (Thank YOU!!!).

We designed the cake to match the fun party colors...lime green, purple & blue...and of course paw prints! The cake was a chocolate cake with cookies n cream filling which is always a hit with the kids (and maybe a few grown ups too)!

A cheerful & fun puppy party for a sweet girl!

Saturday, February 18, 2012

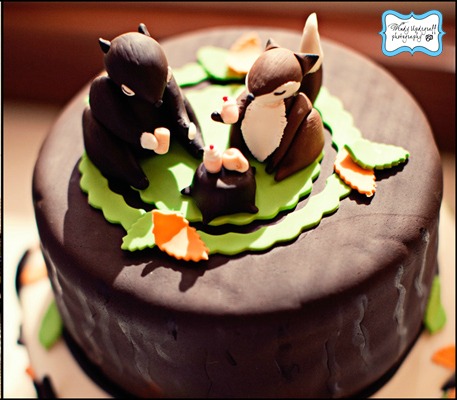
Woodland Baby Shower Cake

I recently had the pleasure of working with Wendy of Wendy Updegraff Photography to create a cake for her sister's baby shower. Wendy, her sister and her mom are a seriously talented trio who put together amazing parties. It's always an honor to play a small part in any of their celebrations. Wendy's sister Jamie chose a  woodland themed shower, which is a perfect theme when you are expecting a sweet baby boy!

The cake inspiration came from the beautifully illustrated invitation from Whimsy Whimsical. As soon as I saw that invitation, I knew I wanted to create those sweet woodland animals out of fondant! But my favorite part to make was the teeny tiny cupcakes.


The cake was a chocolate cake with salted caramel Swiss meringue buttercream filling, which is quickly becoming one of my most requested combos. The top tier is covered in chocolate fondant and the bottom in vanilla fondant.


The shower was absolutely gorgeous with so many beautiful details. You would be amazed to know how much the family did themselves...from sewing the tablecloths, making the centerpieces (the wood used was cut by Wendy's husband) and when their mom told me she cut the wooden banner signs with her jigsaw I about fell over! Check out the gorgeous photos Wendy took and all the fabulous details over at Wendy Updegraff Photography!

*all photos provided by Wendy Updegraff Photography

Friday, February 17, 2012

Strawberry Shortcake {Inspired} Cake

Two of our family friends are sweet twin girls who are turning 4! They love Strawberry Shortcake and so to celebrate their birthday, I made them a strawberry cake!

They asked for the cake to be strawberry with strawberry buttercream filling, so this cake was strawberry inside & out!

Since I'm ruffle-crazed lately, I had to include a ruffle border with a cute little bow.

Happy Birthday to two of the sweetest little girls I know!

Monday, February 13, 2012

Valentine's Day Parties {Round up}

I decided to keep things simple for Valentine's Day this year and am planning on a "sweet heart" breakfast for my girls instead of a party. But I wanted to share a few of the pretty Valentine's Day celebrations done by my sweet Piggy Bank Parties crew members...

Mariah of Giggles Galore always puts together the sweetest parties and her Valentine's Day Kissing Booth Party is no exception! Check out all the adorable details over at Giggles Galore!

You can always count on Cineca of Dreamin' N Details to rock the cute details of any event. Her Valentine's Rustic Love party does just that! So many sweet details & I especially love that frame backdrop!

I love that Aimee of Aimee Broussard Events created a special Valentine's Breakfast for her sweetie! Don't miss the beautiful personalized placemats that she "whipped up"...they are super FAB!

Mayra of In Flight captured the soft romantic aspect of Valentine's Day with her Vintage Valentine Blush inspiration shoot! I really love that she shows how easy it is to take a beautiful romantic theme and also make it kid friendly!

I work with such a talented crew of creative minds and we recently collaborated on a Vintage Valentines Inspiration shoot! In addition to the fabulous ladies mentioned above, the collaboration also featured projects from Do & J Driver (the creative force behind Piggy Bank Parties), Tara the Shindig Diva, Jenny of Crossing the Bugger-Dixon Line, Dorothy of Life is Sweet in Michigan and me! The crew was also joined by two fabulous sponsors...Lynlee's Petite Cakes and Sweet Temptations! We had so many fabulous ideas that they had to be split into two posts...check them out...Vintage Valentine's Inspiration!


I hope you enjoy a Valentine's Day full of LOVE!

Thursday, February 9, 2012

My Brand New FABULOUS Look!!

Did you notice anything new around here??? Like maybe my fabulous new digs??? I'm so excited to reveal my blog makeover from Michele of Intrigue Design Studio!


I LOVE everything Michele did! She took my rambling email full of random likes and dislikes, sprinkled with a few unrelated links and turned that it into everything you see here! First my new logo...


It completely captures the colorful, fun & modern vibe I was going for. It looks awesome on my new business cards and pretty much everywhere!! Then of course there's the whole blog...I love the colors, the fonts, the sweet little hearts sprinkled around. And my social media buttons...aren't they the cutest???


If you are looking for a FAB graphic designer, contact Michele at Intrigue Design Studio and I promise you, she will Rock your world!!!


Thank you Michele, for being super cool to work with! I look forward to more projects with you!

Monday, February 6, 2012

{DIY} Tutu Party Backdrop

I had alot of fun planning my daughter's recent Piggy Ballerina Party! I loved being able to combine the silliness of  cute piggies with pretty ballerina inspired touches. One of my favorite party decorations that I created was the tulle backdrop for the sweets table!

I loved that background and wish I could have kept it up forever, it was so pretty! Today, I'm going to show you how easy it is to make one!

Supplies:
curtain rod 
(2) 3M adhesive wall hooks
tulle...lots of tulle (appx 4 yards)
(2) fabric flowers (optional)

I love 3M Adhesive Wall Hooks! I tend to change my mind ALOT about where I hang things and these removable hooks have saved my walls from many many holes! When I decided to use an inexpensive curtain rod to attach the tulle to, I knew the removable hooks would be the perfect solution to hang it up!


While it wasn't difficult to cut the tulle, it was a bit time consuming...but well worth the effort. I used 3 different colors of tulle and alternated strips on the curtain rod. I cut the tulle into strips approximately 3-4 inches wide. I didn't measure  and just eyeballed it. Then I tied each strip onto the curtain rod.


I just kept cutting and adding strips until I achieved the right amount of fullness...you may like more or less. I used somewhere around 4 yards of tulle total. To make things easier, I only cut the tulle once (the width) and left the length just as it was. I figured I could always trim it shorter if needed, but I found the length to be just perfect!


I originally intended to cover the ends of the curtain rods with a fabric flower. However, in my party day rush I completely forget. Luckily they weren't very visible, particularly with my pretty poms from Pom Flair covering a little of it up. But you can certainly add a flower for extra color and to finish it a little more.


There you have a very simple to make tulle background that will be perfect for any girly themed party!