Showing posts with label Halloween. Show all posts

Sunday, October 30, 2011

Halloween Birthday Cake

If your birthday is going to be close to a holiday, I couldn't think of a more fun one than Halloween! 

 I was recently asked to make a birthday cake for a little girl celebrating with a Halloween costume party! 


Her mom wanted spiders to be featured!

I loved all the fun colors she chose!  


A fun party theme that I'm sure all the kids enjoyed!


Happy Halloween!!!

Tuesday, October 25, 2011

{DIY} The Great Pumpkin Tree & Free Printable

I really love all the Halloween trees  I'm seeing on the party scene this year! When I put together our recent Halloween Play Date, I knew I wanted a tree for the kids. I originally saw a Pumpkin Treat Tree from Pottery Barn, which was the inspiration for mine! 


The Great Pumpkin Tree was super easy 
& inexpensive to make!!

You will need:
1 Plastic Pumpkin bucket 
mini pumpkin buckets
tree branch
black spray paint
candy corn
yarn or ribbon
printable tags (I'm giving you those)
scrapbook paper & stickers *optional
2" circle punch *optional

The first thing you will need to do is spray paint your tree branch black. I found one right in my front yard!! Although you will notice that I "rearranged" some of the branches to my liking, using some electrical tape!

I thought it would be cute to use candy corn as pumpkin seeds, since the fruit of a tree has the seeds inside! Fill your mini treat buckets with candy corn. I found these cute little buckets at the craft store!

Use yarn or ribbon to attach the Pumpkin Seeds tag (provided below) to each little pumpkin.

When your branch is dry, you are ready to put your tree together! You will need to weigh down the inside of your pumpkin in order to hold the branch in & support it. You can get pretty creative with what you want to use!


I used a bag of rice & a bag of leftover candy corn! But you can use pretty much anything you have lying around! Then I covered the opening with some black Halloween netting. 

Then hang your mini pumpkins onto the tree branch. Distribute them evenly in order to keep the tree balanced.

I also decided to make a "The Great Pumpkin" sign for the tree. I used scrapbook paper and stickers to create this simple sign.

Today I'm giving you the Pumpkin Seed printables to use to make your own tree! Just click on the title or on the bottom of the Scribd toolbar to download.


Hope you enjoy your Great Pumpkin Tree!


I'm linking up to these great parties...

Tip Junkie handmade projects
Home Stories A2Z
Nothing But Country

Thursday, October 20, 2011

Halloween Play Date

I recently invited a few of my daughter's friends over for a Halloween play date. Every other week, our school has an early release day. We have friends who attend the same school, so every early release day we take turns hosting a play date. I thought it would be fun to have a little Halloween celebration for the girls on our day.


I kept things pretty simple. I served a few treats and had a couple of fun activities lined up for the kids.


I really loved making the Great Pumpkin Tree. You can find the tutorial and free printable on this post! But I thought it fitting that the fruit of a tree should include the seeds ;)


I also love my Halloween Art which is a FREE download from Nothing but Country! I filled a couple of jars I had with candy corn and a candle and place them on top of my candlesticks. Instant centerpiece!

Even though I love to bake, I opted for some easy & inexpensive treats from the grocery store. 


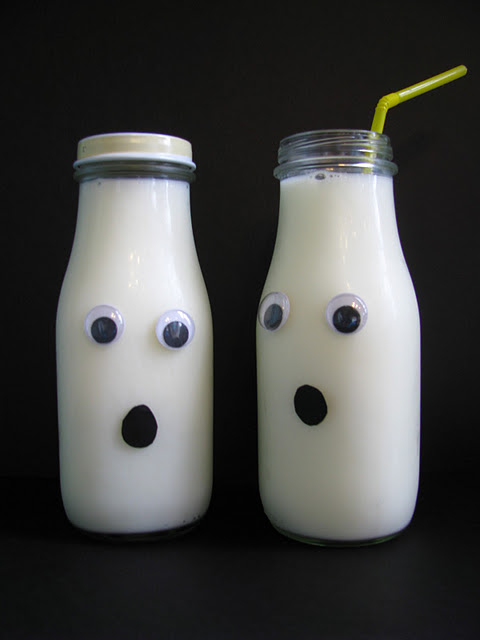
But I had to make the ghost milk (which the kids LOVED)...an idea I got from Sheek Shindigs! And because of it I discovered that I REALLY REALLY LOVE Starbucks Low Fat Frappuccino, which I had to drink to get those cute bottles!!


I had a large roll of black bulletin board paper left over from helping with a project at my daughter's school. Paired with some art paper "place mats", it made for the perfect easy-to-clean tablecloth. I set each place with a pumpkin and supplies.


Each pumpkin had a tag with the girl's name, plus a cute party hat. I had previously made these cute hats for Piggy Bank Parties' Halloween Challenge using their Lil' Hoots Printable Collection! It was great to reuse them and the kids loved them!


The girls had fun painting their pumpkins & eating their yummy treats. We also played a game of Halloween Bingo, which I downloaded for free from Crayola.Even the littlest one enjoyed playing it!


They each went home with their pumpkin, party hat and goody bag. Inside each goody bag was a craft, candy necklace kit, and glow stick for trick or treating. The glow stick goody tag was an idea created by Jenny of Crossing the Bugger-Dixon Line, using a FREE printable from Piggy Bank Parties.

This party was fairly inexpensive since I made most of the decorations using left over scrapbook paper and things from around the house. The kids had a great time, which at the end of the day is what it's all about!

Hope your Halloween celebration is 
SPOOKTACULARLY AWESOME!

Wednesday, October 19, 2011

Guest Posting at Giggles Galore!

I'm excited to be guest posting over at Giggles Galore today! Mariah is a super talented lady who I have the pleasure of being a fellow Piggy Bank Parties crew member with! 


She puts together some beautiful parties and I am in love with her most recent one. Don't miss her super sweet vintage Dick & Jane inspired party she threw for her twins!


Today I'm there to show you how to make this super easy & inexpensive Halloween art so come on over & check it out!


Tuesday, October 18, 2011

{DIY} Duck Tape Pumpkins

Yep, you read that right...Duck Tape! Have you seen Duck Tape recently? It comes in so many fun colors & patterns that I have been itching to do something fun with it. So I did!


I took my boring old craft pumpkin from drab...


to FAB!

It was the easiest, quickest project EVER! Just tape up your pumpkin to your liking...


 and add a little bow. THAT IS IT!!!


My favorite kind of craft project...easy!!!


I'm linking this up to these great parties...


Nothing But Country


Monday, October 17, 2011

Guest Posting at Lil' Luna!

Today I'm very thrilled to be guest posting over at Lil' Luna for their Great Pumpkin Series. Lil' Luna is a FABULOUS blog full of great tutorials, recipes & a Link Party every Wednesday to show off YOUR creations!


Head over today where I'm showing how to make this Glittery Mini Pumpkin Topiary!


lil luna pumpkin button


lil luna link party button

Friday, October 14, 2011

Friday's Fabulous Five {Halloween Party Food}

Happy Friday! Halloween is a little more than 2 weeks away!! If you are planning a Halloween Party then I have some super FABULOUS ideas for some party treats!

As I've mentioned many times, I LOVE food on a stick, which is also so kid friendly. So of course I love these adorable Frankenstein Marshmallow Pops from Nothing but Country! These would not only be a cute treat to serve, but a fun party activity too!

Some more fun on a stick...how about these super cute Mummy Cookie Pops? They are made from Oreos & featured on How Does She? Love them!

These little Funny Bones are made from pretzel sticks, mini marshmallows & white chocolate! So fun!!! You can find the recipe at Epicurious.

I know Halloween is all about the sweets, but it's good to have some actual FOOD at the party too! I love how clever these Sand Witches are!! The complete how to can be found on Fiskars.

Finally, you need something to wash down all the party treats with. This Ghostly Glass of Milk is just the perfect thing! I just love  these cute ghost glasses found on Sheek Shindigs!


There you have five party treats 
to help make your Halloween Party FABULOUS!

Hope your weekend is full of spooky fun!!

Sunday, October 9, 2011

{DIY} Halloween Party Hats

I'm over at Piggy Bank Parties today, sharing a tutorial for some festive party hats! I featured these hats in the Halloween Challenge and now I want to show you how easy they are to make!


Head on over to Piggy Bank Parties for the tutorial!


Friday, October 7, 2011

{Halloween Guest Blogger} Mariah from Giggles Galore

Happy Friday! It's been so much fun having awesome guest bloggers this week and I have one more fabulous person for you! Mariah from Giggles Galore is here today to share a fun Halloween tutorial!

Mariah throws ADORABLE parties and makes so many cute crafts for her family that she shares on her blog. I love the Tattle Monster she made as a fun lesson for her little ones! And now she's here to share another cute project...

Hi, Love & Sugar Kisses fans!  I'm Mariah from Giggles Galore and I am super excited to be here today sharing one of my new Halloween creations!

I saw an invitation in a magazine (can't remember which one) and I loved how they used buttons to create a bubbly cauldron.  I thought the idea was perfect for creating a larger scale design to hang on the wall for Halloween.

Today I'm going to show you how to make your own bubbly cauldron for Halloween for only a few dollars and in less than 30 minutes.

First, you'll need to decide on your color scheme and pick out buttons and scrapbook paper to match.  I went with lime green, yellow and purple.

Next, I used my Cricut to cut out a cauldron shape, but if you don't have a cutter you could find an image online and enlarge it to the size you want and cut and trace on black paper. I cut my scrapbook paper to fit in my 11x14 picture frame and attached the cauldron to the center.

Now, it's time to create your bubbly brew.  I placed the buttons and arranged them how I wanted them.  Then I used adhesive dots to adhere them.  Once I had them placed I pulled cotton balls apart and stuck bits of fluffy cotton in between buttons.

For fun I added a tag that said "Something's brewing..." but you could leave it as is or put a different saying.

All done, I told you it was quick and easy!  Now you've got a fun and festive bubbly cauldron to display for Halloween.

HAPPY HALLOWEEN!

Thank you Mariah for sharing this adorable bubbling cauldron tutorial! I LOVE button crafts and this is such a fun idea!

If you aren't already a fan & follower of Giggles Galore, you can find Mariah here: