Saturday, March 31, 2012

Beach Cake

A birthday party at the pool next to the beach calls for a colorful beach themed cake!

I love the bright colors of this fun cake! Finished in buttercream and decorated with hand-cut & handmade fondant decorations (I used a mold for the shells only). Inside both tiers are chocolate cake and chocolate buttercream...requested by the chocolate-loving birthday girl!

A fun cake that puts you in a summer mood!

Thursday, March 29, 2012

{DIY} Spring Wreath

I love having a cute wreath on the front door and I knew I needed to make one for Easter. If you read yesterday's post about the napking rings, you know my goal is to only use what I already have for all my Easter & spring decorations. So I whipped up this wreath doing just that!

This was super easy to make and I only used a handful of supplies:
-wreath
-burlap or fabric to cover wreath
-yarn
-felt
-buttons

I actually had this wreath wrapped with burlap on hand. You could use fabric instead of the burlap. It was left over from a Valentine's Day craft FAIL, but like a good crafter I hung on to it knowing it would have it's day eventually! All I did was cut the burlap into wide strips, wrap it around the foam wreath & hot glued the ends.

I have this really fun multi-colored yarn that I just love...it's so cheerful so I had to use it! I'll be honest...my original intention was to COMPLETELY COVER the wreath in this yarn. But you know what? That takes a REALLY LONG time...and I have no patience for those kinds of crafts. So I went with a more "whimsical" look...and I ended up really liking how the burlap shows through.

I made some very simple flowers out of felt, using a flower template that I printed out. I cut the flowers out with the inside flower being smaller than the previous to achieve a layered look. I hot glued them on and then used some colorful buttons in the center (as I've mentioned many times...I love buttons)!!


I'll be using this wreath for Easter, but it's perfect to keep up all spring!

Happy Spring!


I'm linking up to...


Wednesday, March 28, 2012

{DIY} Easter Napkin Rings

I recently cleaned out and organized my craft cabinet and man...that was an EYE-OPENER!! It turns out that I buy waaay too much craft stuff that NEVER EVER gets used! Who knew??? (well according to my husband HE knew...ha ha ha)! Sooooo...I'm hosting Easter this year and decided that I was going to make all the decorations using only what I already had on hand. So Michael's PLEASE stop sending me all those great coupons!!!!

I have no idea why on earth I have a TON of felt...but I do, so it's going to be featured in most of my Easter decor. The first thing I made were these cute & colorful napkin rings!

These were super simple to make and I whipped up 10 of them in less than an hour!

You will need:
felt in various colors
ribbon
buttons or other embellishments
hot glue

To begin, cut your ribbon to your desired length. I cut mine about 10 1/2" long. This length allows for a large enough hole to slip a napkin into.

Then I cut out my egg shapes out of felt. I googled an egg template,printed it out on cardstock and used it to cut my eggs out. I tried to free hand them, but my eggs were all wonky so the template was easier.

Cross your ribbon over and use a dab of hot glue to secure.

Then use another dab of hot glue and attach your egg.

I have a thing for buttons...so I have lots of bags of them. I thought these pretty flower buttons were perfect for spring.

Hot glue the buttons onto the eggs.

That's it! Cute little napkin rings to add some cheer to your Easter table!

I was taking the pictures for this post, staring at these cheerful little creations got me thinking...

And I thought of another fun use for them...

I might just have to whip up a few more of these little cuties!

Happy Spring!

Monday, March 26, 2012

Hunger Games Cake {Cake on Fire}

Are you a Hunger Games fan? The book was recommended to me and I DEVOURED the series...just loved it! I was actually sad when I finished the last book because I knew that was it! But then of course there was the movie. My friend Wendy of Wendy Updegraff Photography hosted a Hunger Games premiere party and everyone brought a dish inspired by the book. Of course you know I had to bring a cake!

I LOVED making this cake!!! I wanted the cake to be on FIRE because if you've read the books (or have seen the movie) you know fire is an important element! I wanted it to be engulfed in flames with the Mockingjay rising out of the top...the symbol of rebellion and freedom! (yeah...I totally dorked out on the books I know).

All the decorations (including the Mockinjay topper) were hand-cut from fondant. This was actually the 2nd topper I made, as the first one just snapped in half (oh SNAP) and I sprayed it with edible gold.

The party was AWESOME! Everyone brought great dishes and we played trivia before heading to the midnight showing. With a theater full of teenagers, I've never felt so O-L-D in my life LOL!!

You can read all about the party & see the great pics on Wendy's post at Wendy Updegraff Photography. All photos in this post were taken by Wendy...except for the close-up of the Mockingjay topper, which was taken by me.

HAPPY HUNGER GAMES &
MAY THE ODDS BE EVER IN YOUR FAVOR!!

Friday, March 16, 2012

Country Music Groom's Cake

I make alot of cakes for kids and girly-type cakes, so it was fun change of pace to make a groom's cake. The groom-to-be loves to play guitar and is a country music fan so I incorporated those elements in his fun cake!

Cowboy boots, cowboy hats and a rope border for that country feel...


Hand-shaped musical notes spilled down onto the cake...

and an acoustic guitar topped the cake!

It was fun to feel a "little bit country"!

Friday, March 9, 2012

Love Fest Blogiversary Celebration {Shout out edition}

Logo by Intrigue Design Studio

Tomorrow marks ONE YEAR since I began this blog and what a fun year it's been!!! On Monday I'll be hosting an AWESOME giveaway to celebrate...but first, I wanted to share a little about how my blog evolved. This is going to be one of those long wordy posts, but I hope you'll indulge me as I have a few special people I wanted to give thanks to!! Grab a cup of coffee, or tea, or a bloody Mary if that's your thing ;)

This is actually my FOURTH blog...but I think a total of 5 people read my previous ones LOL!! My very first attempt at blogging was Adventures of Glitter Mommy. I wanted to share the fun crafts I did with my daughter. But after a few months, I realized it was just too hard to document everything with a 3 year old and newborn! And man...I was so TIRED!

Then I thought I'd share all the yummy recipes I was baking up in Adventures in Baking! But I didn't have time to bake enough to sustain a blog, so I gave that one up too! This is a picture of a YUMMY blueberry cheesecake I made and posted...

Then I really got into cake decorating and started yet ANOTHER blog...this time to showcase my cakes. It was called I Love Cake! But it was just a place to post pictures of cakes and not much else so I felt it was too limiting.

But I REALLY loved having a blog and wanted to create THE ONE! That's when I finally realized that I needed a blog where I could share crafts, recipes AND show case cakes I'd made....so then Love & Sugar Kisses was born! And it's become more than I ever imagined. It's my happy place...a place to share not only MY creative side, but to share all the other amazing things I find that other people are doing too!

But what's been the completely UNEXPECTED bonus of being a blogger is the awesome people I've met along the way...
About a month after I posted my very first post, my daughter's Minnie Mouse 2nd Birthday, I was contacted by Jillian of Catch My Party! I had uploaded my party onto her site and she just LOVED the party hats I'd made. She asked me to share the tutorial I had created with her readers on her site. I was pretty stunned!! The party was done "pre-blog" so I didn't have a whole lot of pictures to show off, but she liked what she saw anyway. I was in DISBELIEF and completely THRILLED that someone other than a friend or family thought anything about something I'd created! 

I can't say enough wonderful things about Catch My Party! It's such an amazing site. So many blogs are filled with gorgeous, but professional or high dollar parties. Catch My Party gives non-bloggers or non-professionals a chance to show off their creativity too and for others to gain so much inspiration from! And Jillian is so incredibly sweet and quick to share & highlight a detail of a party (be it a cake or decoration or the like) on her Facebook page! And being part of her "Party of the Day" is such a fun honor and one I've been the happy recipient of a few times! Thank you Jillian for letting ANYONE show off and SHINE no matter who they are! You are awesome!!!


Nothing But Country

Later in the year, I started planning my oldest daughter's Puppy Party. I had been a fan of Nothing but Country for awhile and discovered Mary Beth was planning a Puppy Party for her daughter around the same time. We chatted back and forth about our ideas and plans. And before I knew it...I had made my first bloggy friend! Mary Beth was the first person who asked me to create a guest post on their blog. I SWEATED coming up for an idea. I was so stressed not wanting to write a lousy post for someone else!!! Of course the first person to write a guest post on MY blog was Mary Beth! She is not only a fun creative person, but genuinely kind and sweet too! No matter what happens with my blog in the future, Mary Beth will always have a special place in my heart as the first person I made a real connection with in the blogging world!!


Another site I had been following for awhile was Piggy Bank Parties! I loved how they threw fun & creative parties on a budget and I got alot of inspiration from that. Then late last summer, they put out a "casting call" for contributing writers. I thought about it for DAYS. I wanted to apply, but I was afraid of being disappointed. Finally, I bit the bullet and applied anyway. I honestly did not expect to be hired. What I had hoped is to maybe gain a new fan and supporter for my blog. Of course that's not at all how it worked out!!! Piggy Bank Parties DID hire me and I about fell out of my chair the day I got that email.

My entire blogging world changed DRAMATICALLY after that! Suddenly I was part of something bigger than just my blog. If you would have asked me a year ago if I would consider anyone I'd never met face to face a friend, I would've told you NO WAY!!! But now, I can tell you that I DO have friends I've never met. Do Driver, the pun slinging cheery leader of Piggy Bank Parties, is one of those friends. She has supported me, encouraged me and celebrated my successes from the day I joined her team. She has become a business mentor, giving me much needed advice as I struggle to develop and grow my business...with positive real world advice that has been so incredibly helpful!! She is just a talented, funny, sweet and kind person and I'm so happy to know her! And when Do brought me onto the Piggy Bank Crew, she created the opportunity for me to meet the rest of the crew....all AMAZING LADIES!!! 

Cineca of Dreamin N Details, Jenny of Crossing the Bugger-Dixon Line, Aimee of Project:Aimee, Mariah of Giggles Galore, Mayra of In Flight, Tara the Shindig Diva and Dort of Life is Sweet in Michigan....these are all amazing women! They are creative, talented, inspiring and fun to get to know!

In our private "pig pen", I've enjoyed laughs with these great ladies. But they have also been the people I have turned to share my fears with when I began to grow my business...when I got completely overwhelmed and struggled to figure out how to be a wife, mom and business owner. When I thought I was drowning...they threw me a lifeline of supportive advice and shared experiences. In short, I learned that they were real people behind their successful businesses and blogs. They made me feel so much better about myself when I learned that they struggled with some of the same issues too. Being a part of the crew makes me feel like I am part of this special club, this fun band of party sisters!! Before the year is over, I hope to finally meet them all in person for what I'm sure is going to be one HECK OF A PARTY!!! Love you ALL ladies!!


After I began to focus on selling fondant decorations, I began to meet more amazing people. A few ladies who are SUGAR ARTISTS have been particularly inspiring to me. Lynlee of Lynlee's Petite Cakes, Brittany of Edible Details and Brenda of Sugar High, Inc are 3 incredibly talented women who's amazing skill and creativity INSPIRE ME and push me to work harder on my craft...to learn more and do more! What has been especially wonderful to discover is that they are also incredibly supportive of others, including me! Their kind words and comments about my work has made my day many times and means the world to me!!


While I've focused on all the fabulous people I've met online, I cannot talk about this past year without mentioning someone that I've met in person. A person who has helped my local cake business GROW...Wendy Updegraff of Wendy Updegraff Photography! Wendy is an amazingly talented photographer who throws equally amazing parties. I mean, she's so fabulous Kara's Party Ideas dedicated a whole day to feature nothing but her work! Creating a cake for one of Wendy's party is a thrill because I know it will end up all over the blogging world and it's an honor to be a part of anything she does. Between Wendy and her equally talented sister Jamie (who may not have a blog, but should because her eye for design is AMAZING), I have received so many referrals for new customers. Both Wendy and Jamie have been so wonderfully supportive and I'm happy to say that they have grown from being customers to being friends and are genuinely sweet & kind people!!

Well if I were giving an acceptance speech at the Oscars...the music would've started playing LONG AGO. Wait...do they give out Oscars in blogging??? LOL! There are so many other fun, inspiring people I've grown to adore that I could go on and on, but I gotta stop somewhere. Although I do have to mention ONE more person. She's a creative, sweet, crafty mom who I do adore...Staci of Lizard & Ladybug. Not only do I love Staci because she's COOL, I love her because on the days when I swear I could hear crickets chirping on my FB page, Staci will come along with a "like" or sweet comment. Staci you've made my day on those days and I appreciate your sweet support!

Ok...if you've stuck with me this long I THANK YOU!!! Thank you for reading my blog, following along on my Facebook page...giving me a "like" or a comment. That really means more than you know!! I'm still amazed and in awe that anyone outside of my friends and family give a hoot about anything I do and that fact that I've surpassed 1,000 fans on my Facebook page is just mind blowing!!! From the crazy mom who is sitting in her often chaotic home in her pjs, with too many dishes in the sink, often too much Dora on the TV, dreaming in sugar...I thank you!

Check back on Monday, where I'll be thanking you with an AWESOME Giveaway you won't want to miss!!
Have a great weekend and keep it FABULOUS!!!

Saturday, March 3, 2012

Zebra & Stars Baby Shower Cake

I an animal print kinda girl, so I was super happy to make a baby shower cake featuring fun zebra stripes! Mommy-to-be also wanted to incorporate pink shimmery stars for the little "star" about to make her debut!

The cake was a strawberry cake with strawberry cream cheese filling and a carrot cake with cream cheese filling...all covered in a yummy vanilla buttercream! Zebra stripes, stars and ribbon all made from vanilla fondant.


A super fun cake for a wild little star getting ready to enter the world!

Thursday, March 1, 2012

Salted Caramel Swiss Meringue Buttercream {Recipe}

I was so excited to share this delicious recipe with you today...and then I realized I'd already shared it...back on this cake post LOL!!! But since I spent all morning taking and editing pictures for today's post, I'm going to share it again anyway! This is more of a step by step recipe than the original, so hopefully you'll still enjoy this somewhat of a {repeat} performance.

This amazing Salted Caramel Swiss Meringue Buttercream is definitely one of my most requested cake filling flavors and a personal favorite as well. If you've never made Swiss Meringue, it may seem a little complicated, but I promise it is easier than it appears and totally worth the effort!! The complete recipe is at the end of this post and is adapted from the fabulously talented Sweetapolita's recipe!


The first step is to make the caramel by boiling the sugar and water together. I set my stove to just above medium, but each stove is different so you may need to adjust your settings. Stir the mixture occasionally until it begins to gently boil.

Once it begins to boil, stop stirring and instead gently swirl the pan from time to time. You want to boil your sugar until it turns amber colored. For me it takes about 14 minutes. It is super important not to walk away because once the sugar starts to caramelize, it's fast and can burn quickly. A burnt caramel cannot be saved...so keep an eye on your pot! When it's amber colored...pull it off the stove.

Next, whisk your heavy cream in. It will sputter and spit at you so be careful because that sugar is hot! Add your salt and whisk until smooth.

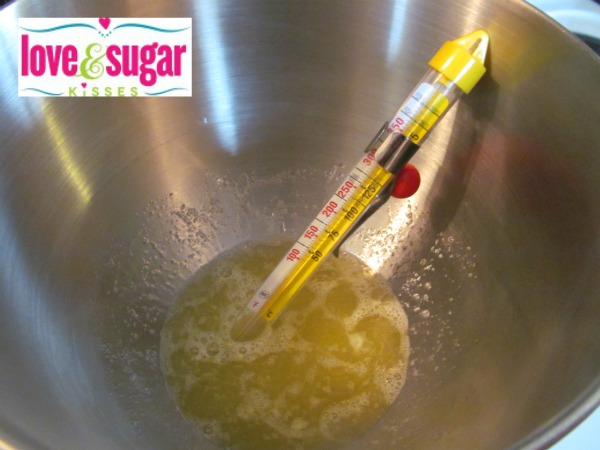
Now put aside that beautiful caramel to cool while you make your buttercream. The first step to making Swiss Meringue is too heat your egg whites with the remaining sugar. You don't have to own a double boiler to do this. As as you can see, I just fill a pot with an inch or so of water and get the water simmering (not boiling). Then I put my mixing bowl right on top.

A candy thermometer is a must...mine is a little too short, but it does the job. Your goal here is to heat the eggs until they reach 160 F...NOT to scramble them. Whisk them every now and then while they heat up.

Once they reach 160, take your mixing bowl off the pot (wipe it dry) and attach it to your mixer with the whisk attachment on. You are going to whip the egg whites on a medium speed for about 5 minutes. Then increase your speed to medium high for 5 more minutes until you have stiff glossy peaks. Maybe I'm just a kitchen dork, but I think it is so COOL to watch egg whites go from watery goo...

To fluffy, delicious meringue!!

Once the bottom of your mixer bowl is no longer warm to the touch, you can begin adding your butter...a little at a time.

Don't be alarmed if the mixture begins to look a bit curdled like this...it's perfectly normal. It will come back together smoothly!

Add your vanilla and continue whipping until your frosting is fluffy and smooth. Now it's time to add in the caramel. Switch your mixture to the paddle attachment and pour in the caramel.

Beat mixture on low to medium for about 3-5 minutes until the caramel is fully incorporated. You have just made one of the most DELICIOUS silky smooth frostings there is!

This frosting goes on so smoothly and will melt in your mouth! I find the salt in the recipe to be just the right amount and gives just a hint of salty. But if you prefer a tad more salt, you can sprinkle a little on top of the frosting between your cake layers.

Chocolate cake and salted caramel buttercream is my favorite combination!

Here is the recipe in it's entirety! Enjoy!!

Salted Caramel Swiss Meringue Buttercream
adapted from Sweetapolita

Yield: 4 cups
Ingredients:
1 cup sugar
1/4 cup water
1/4 cup heavy cream
1/4 tsp sea salt (additional for sprinkling is optional)
1 1/2 cups unsalted butter (3 sticks cut into pats)
4 large egg whites
1 tsp pure vanilla extracct

Directions:
First, make the caramel as follows:
Place 1/2 cup + 2 Tablespoons of the sugar and the water in a medium saucepan over medium heat.
Brush down the sides of the pan w/ a damp pastry brush to prevent sugar crystals from forming (or a damp paper towel will work as well).
Stir the sugar and water together. Stir occasionally until water begins to boil.
Continue boiling sugar, gently swirling in the pan from time to time, until it reaches a dark amber color.
Remove from heat and slowly add cream, whisking until smooth.
Whisk in sea salt and set aside to cool.

Next, make the buttercream:
Wipe the bowl of your mixer clean with lemon juice. This helps remove any residual grease or fat that may be on your bowl, which if present will keep your egg whites from whipping up! 
Place egg whites and remaining sugar in the bowl and whisk together.
Place bowl over a pot of simmering (not boiling) water.
Using a candy thermometer, heat eggs and sugar until the temperature reaches 160 degrees Fahrenheit (whisking occasionally).
Remove bowl from heat and place onto mixer with the whisk attachment on. Whisk eggs on medium speed for 5 minutes.
Increase speed to medium high and whisk for 5 more minutes or until stiff glossy peaks form.
Once the bottom of the bowl is no longer warm to the touch, add butter a little at a time.
Add vanilla and continue to whip for a few minutes or until frosting is smooth.

Finally, switch to the paddle attachment and add in the caramel. Mix until fully combined, scraping the sides and bottom of bowl. Frosting can be stored tightly covered for several days at room temperature. If you refrigerate, be sure to let it come to room temperature and re-whip before using.

I know you'll enjoy eating this delicious frosting and I hope you enjoy making it as well!