Monday, May 16, 2011

Chocolate and Coconut...the perfect combination!

I'm a vanilla girl. Vanilla cake, vanilla ice cream, vanilla cookies...given a choice I will pretty much choose vanilla in most sweet situations. But I tried out a new chocolate cake recipe that I'm so in love with, it might actually trump vanilla for me!

One of my other favorite flavors in the world is coconut and well, chocolate & coconut are pretty much an incredible combination no matter what the vessel (cake, candy bar, cocktail...)!

Doesn't this cake look so innocent and angelic?


Fluffy Coconut Italian Meringue frosting swirled all around with shredded coconut dressing it up...It looks so sweet, but you know that even the sweetest things in the world have a dark side...


And what a delicious dark side it is...

I discovered the cake recipe on the blog The Whisk Kid. If you haven't check out her blog, definitely take a look. She's a 20 year old college sophomore and a talented baker and photographer. She has quite a following and her talents even landed her on the Martha Stewart show. And yes you read that right...she's TWENTY!

The chocolate cake is dense, but moist, with a rich chocolate flavor. The richness of the cake pairs perfectly with the light & fluffy coconut frosting.

The Whisk Kid's recipe is for a 6" cake, but unless you own a kitchen scale you will probably find it hard to measure. I know I can't accurately measure 3/8 of a cup of anything (but I'm working on getting that scale). Her notes tell you that doubling it will give you a 2 9" cakes. To make the doubling easier I used an online recipe calculator as I don't like to rely on my sketchy math skills. But I've gone ahead and provided the recipe already doubled for you. 

Deep Chocolate Cake adapted from The Whisk Kid

2 2/3 cups flour
3/4 cup cocoa powder
1 tablespoon baking soda
1/2 teaspoon salt
1 cup butter, room temperature
3 cups brown sugar lightly packed
4 eggs, room temperature
2 teaspoons vanilla
1 1/3 cups sour cream, room temperature
1 1/3 cups hot coffee


{Preheat oven to 350F (175C). Grease two 9-inch pans (I use Bakers Joy spray). Set aside.

Sift together the flour, cocoa, soda and salt in a large bowl and set aside.

Cream the butter and sugar, until very light and fluffy, about 5 minutes. Add the eggs, one at a time, beating until very well incorporated. Add the vanilla. Being sure to scrape the bowl often, pour in a third of the dry ingredients, mix until just combined, then add half of the sour cream and mix until just combined. Repeat, then add the remaining dry ingredients. Gently stir in the hot coffee, and pour into prepared pans. Bake 35 to 40 minutes. Place baked cakes in pans on a cooling rack for ten minutes, then remove the cakes from the pans and allow to cool completely before frosting.}

A little trick for keeping your scratch cakes moist is to wrap the layers in plastic wrap before they cool completely. Once your cakes have cooled in the pan for ten minutes, turn the cake layer out onto a cardboard cake round (you can find these in the cake aisle of any craft store). Place a large piece of plastic wrap over the exposed cake part, then place another cake board over the plastic wrap. The cake and plastic wrap should now be sandwiched between the two cake boards. Flip it over, remove the cake board from the top side and wrap the plastic wrap over the exposed cake. Do this a few times around with the plastic wrap, always using the cake boards as support so your cake doesn't rip in half. Be sure not to wrap so tightly that you warp the shape of the cake!

Wrapping the cake in the plastic wrap while it's still fairly warm, will help trap the escaping steam and keep your cake super moist! I leave my cakes wrapped until they are completely cooled and ready to frost.

For the frosting, I made an Italian Meringue Buttercream and added 2 teaspoons of coconut extract instead of vanilla. You find the recipe and watch a video on how to make it in my previous post. The flavor of the coconut was not overpowering, and at my husband's request,  I also added shredded coconut in between each layer and then sprinkled some on the top and bottom of the cake as well.


Delicious! So go on and enjoy a little chocolate & coconut love yourself!

Tuesday, May 10, 2011

DIY {Fabric Magnet Board}

One of these days I'm going to have a wonderful {Before & After} post to share of my home office/creative space. But since that seems to be taking forever to complete, I thought I'd share a simple fabric covered magnet board tutorial that is a small part of that makeover.


I had (ok I admit I'm still a little guilty) a very bad habit of taking "important papers" and stacking them in a pile on my desk. That is probably the worst way ever to organize anything and I was tired of missing paperwork and deadlines! I knew having things in my face was the only way I was going to keep track of everything. So a pretty magnet board seemed like the perfect solution and I love it!

You can make this super easy yourself with just a few supplies:
-A magnet board: I used one purchased for around $6
-fabric of your choice 
-coordinating ribbon
-hot glue


First I cut the fabric to cover the front of my board and a few inches around the back. You can see that I didn't spend much time cutting neatly. Make sure the magnetic part of your board is face down on your fabric like so...


Then I just went around hot gluing everything down. I did cut the corners at an angle so they would fold neatly...


I cut my ribbon long enough to cover the front of the board with a few inches to spare in the back and hot glued that down as well....


Of course I realized I wanted some cute magnets to go on my board. I happened to have just what I needed in my craft box, remnants of some project I can no longer recall...


I just hot glued those magnet backs onto those cute buttons and ta-da...adorable magnet buttons!


Now all my "don't forget" items are front and center! So I guess I will have to come up with another good excuse as to why I let that coupon expire, or didn't RSVP or well...you get the picture...


Happy Crafting!

Linking up this post over at


Nothing But Country


Sunday, May 8, 2011

S'mores Cupcakes

Chocolate...graham crackers...marshmallows...a combination that pretty much always ends in YUM! I've been wanting to make s'mores cupcakes for awhile now and had the perfect opportunity recently when I needed to bring some cupcakes to my daughter's preschool.


I searched a number of recipes online and I found one that looked and sounded like a winner here on Annie's Eats. The crushed graham cracker crust sounded tasty and her cupcakes looked beautiful. The recipe yielded enough graham cracker crust and batter for about 30 cupcakes.

 The chocolate cupcakes baked up perfectly and I will be using that recipe for my chocolate cupcakes from now on! But I wanted to do something different for the frosting and there was a recipe I had on my "must try" list that seemed perfect...Sweetapolita's Toasted Marshmallow Frosting!   She uses the frosting as a filling for her decadent looking 6-Layer Rich Chocolate Malted Cake...which I plan on making in the near future. After you are finished drooling over her mouth watering cake, you will find the frosting recipe towards the end of her post.

The combination  of the marshmallow frosting (which calls for actual toasted marshmallows) and the chocolate cupcake with graham cracker crust was delicious! An absolutely perfect combination that I will most definitely making again. If you try it, make sure to double the Toasted Marshmallow Frosting in order to have enough for 24 cupcakes.

But of course the cupcakes did need a finishing touch...


Can there ever be too much chocolate on a dessert?


My answer is no :)


Happy Baking!

Thursday, May 5, 2011

All ruffled up

I've been admiring all the beautiful ruffled cakes I've been seeing lately. Normally, I work hard to make sure my buttercream cakes have a smooth fondant-like finish. I love a smooth & clean looking cake! But I kept seeing those pretty feminine ruffles....so I decided to give it a whirl!

And it was quite a literal whirl...whirling and whirling curls of buttercream over the entire cake.


I love the old fashioned and decidedly feminine look of this style. It would be perfect for a ladies tea, shower, or oh let's say maybe...Mother's Day? ;)


The cake is a mango cake made with fresh mango puree. It's filled with more of the puree and frosted in vanilla buttercream. A flavor combination that I think is perfect for our warming weather.

The ruffling technique is actually pretty simple, honest...so don't be afraid to give it a try! There are a number of great tutorials available. Check out the amazing  Sweetapolita's Rich & Ruffled cake.

And for a great video, take at look at the YouTube tutorial provided by My Sweet & Saucy, who's site is chock full of more drool worthy confections and photos.


Happy ruffling!

Monday, May 2, 2011

Rock Candy Cake

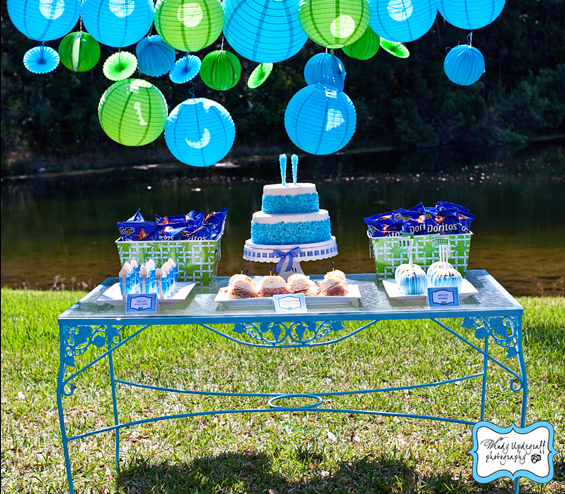
A few weeks ago, I had the pleasure of making a cake for Wendy Updegraff of Wendy Updegraff Photography. She threw her son an awesome water themed party, complete with dunk tank!

In our talks regarding the cake design, it became apparent very quickly that her son had pretty sophisticated taste for an almost-eleven-year-old! He definitely did not want a typical "kiddie" cake. But we still wanted the cake to be fun while complimenting the water theme. 

What could be more fun and kid friendly than a cake covered in rock candy?


I love how the light and dark shades of blue rock candy echo the water element. Wendy came up with the clever idea of using the rock candy sticks as the number eleven...perfect touch! The bottom cake tier was red velvet and cream cheese filling (the birthday boy's favorite) and the top tier was vanilla with chocolate filling.

Check out the colorful and fun food table!


For more pictures and details  of this incredibly fun party, check out Wendy's post Water Wars!

Wednesday, April 27, 2011

Cinco de Mayo {Party Inspiration}

I have some Cinco de Mayo party inspirations to share with you (along with some FREE party printables). But first...a little background on the holiday. 

For many of us, Cinco de Mayo is great excuse to eat delicious Mexican food and drink Margaritas (as if we really need an excuse anyway)! But I think it's also a great opportunity to learn a little history (mostly because I'm an information junkie who really loves facts & trivia).

Some interesting facts...
  • Cinco de Mayo is NOT (as many people believe) Mexican Independence Day (which is September 16th)
  • Cinco de Mayo celebrates the Mexican victory over the French at The Battle of Puebla in 1862
  • Outside of Puebla, the holiday is not widely celebrated in Mexico
  • In the U.S., the holiday began in 1967 when a group of California State University students decided to hold the first Cinco de Mayo commemoration in the United States as a way to celebrate their Mexican-American heritage.
  • It wasn't until the 1980s when marketing companies (largely beer companies) began capitalizing on the holiday, that it gained the popularity we see across the U.S. today
  • The largest Cinco de Mayo event in the world is held in Los Angeles, California, where more than 600,000 people celebrate with music and food.
Ok...mini-history lesson is over. Now for some fun party stuff!

The TomKat Studio is offering some festive & *free* printable invitations and party circles. I just love this color combination!


Catch my Party is featuring a great *free* printable party package that includes a 5×7 invitation, party circles, drink flags, water/beer bottle labels, and a “Cinco de Mayo” banner. How awesome is that?


Cakes Likes a Party is offering this *free* and festive printable party banner...


I just LOVE LOVE this beautiful Cinco de Mayo Birthday party table designed and styled by Bird's Party!


Be sure to check out Bird's blog for more beautiful pictures of this fun party! And you just might see that gorgeous color combination of hot pink, orange, and lime showing up on a cake in the very near future...hint...hint!

This Fiesta party was featured on Hostess {with the mostess}. It was a 40th birthday celebration, but the decorations are gorgeous and perfect for a Cinco de Mayo celebration as well. And just reading about the delicious food that was served makes me hungry for some Mexican!


For many Mexican-inspired recipes including drinks, appetizers, desserts & more, check out The Food Network's Cinco de Mayo page. So many delicious sounding and hunger inducing recipes like this one for Bobby Flay's Red Chile Short Rib Tacos. Um...yes please!


Epicurious is also a great source for authentic Mexican recipes and tips for hosting a Cinco de Mayo party. How beautiful does this table of  deliciousness look? Chef Miguel Ravago shares some of these recipes for an authentic Mexican fiesta!


Of course as I mentioned before...for many of us (ME), a Cinco de Mayo celebration wouldn't be complete without a Margarita (or two). Hostess {with the mostess} features recipes for 10 unique Margaritas. Like this Prickly Pear one from My Sweet & Saucy that is almost too pretty to drink (I said almost)!


I hope you enjoy your Cinco de Mayo celebration with great friends, great food, great drinks and lots of love for Mexican and Mexican-American culture!

Monday, April 25, 2011

Spring Cake

For our Easter dinner, I made a cake to celebrate spring...butterflies, branches with flowers, and a sweet birds' nest with speckled eggs.

The cake was a vanilla cake filled with strawberry cream (made from fresh strawberries) and frosted in vanilla buttercream. The decorations are made from marshmallow fondant.


Close up of my favorite part...the nest and speckled eggs!


I really loved the color combination of the light blue, brown and orange. So pretty for spring!